

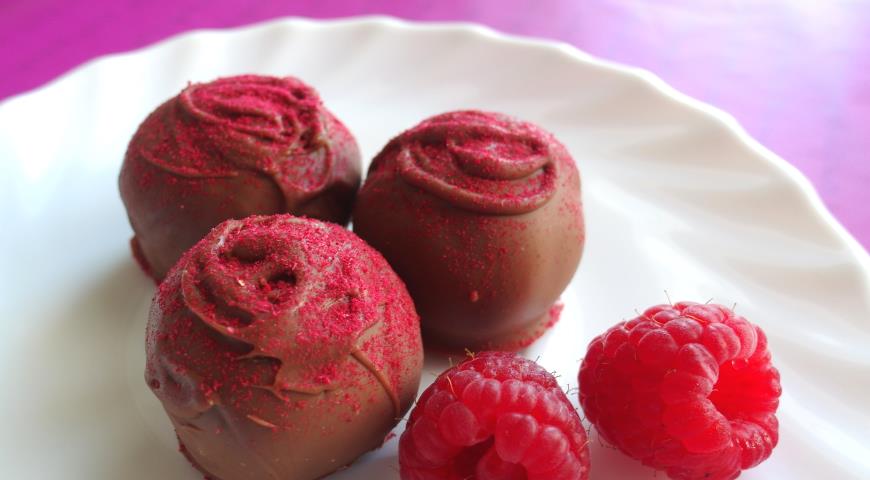
Incredibly delicious homemade sweets, in which under the crunchy crust of milk chocolate, shaded by a slight sourness of powdered freeze-dried raspberries, is a delightfully soft, truly melting in the mouth, delicate sweetness slightly bitter chocolate-truffle filling with a slight raspberry aftertaste ... A pleasure that is very hard to refuse! Especially when you consider that it's elementary in the preparation and requires no special tools. To achieve optimal results, use only quality ingredients for candy, in particular, chocolate, which does not contain any substitutes and equivalents of cocoa butter. Make sure that the chocolate is at room temperature. If you have previously stored it in the refrigerator (as I usually do, especially in the summer), let it warm up beforehand (taking it out of the refrigerator at least 2-3 hours before making the truffles). 2. Invert confectioners' sugar (trimolin) is needed as a moisture-binding agent and anti-crystallizer.
Chocolate truffles with raspberries
PARTICIPANT
CONTEST
INGREDIENTS
1. For the candy mass:
bitter chocolate with 70% cocoa 125g.
milk chocolate with 30% cocoa 125g.
Frozen raspberries 150g.
Confectionary invert sugar (trimolin) 15g.
2. For decoration:
milk chocolate with 30% cocoa content 150 gr.
Freeze-dried raspberries approx. 2 tsp.
STEP BY STEP RECIPE
Step 1

In advance (2-3 hours before making the candy mass) remove the packages with bitter and milk chocolate from the refrigerator, if you store it there. Also, 1-1.5 hours before cooking, take the necessary amount of raspberries from the freezer according to the recipe.
Step 2
Before making the candy mass, break both kinds of chocolate into pieces in a small metal saucepan with a thick bottom, about 750 ml (I have Ø 14 cm).
Step 3

Put the water in a saucepan slightly larger in diameter than the bottom of the saucepan with the chocolate - for a water bath - on a medium heat and bring to a boil, then reduce the heat to a small one, so that the boiling is not too intense. Put the container with chocolate on a water bath (the bottom of the saucepan should not touch the boiling water) and melt, stirring constantly with a spoon, about half, then turn off the fire and bring the chocolate to complete melting, also stirring it. Afterwards, wipe the bottom of the saucepan to remove any drips and set aside to let the chocolate cool.
Step 4

Chop the thawed raspberries in a blender until you purée them and then strain through a fine sieve into a small metal saucepan with a thick bottom (I have about 700 ml and Ø 12 cm). You should end up with 100g (!) of puree. Don't throw away the raspberry cake: you can put it in hot tea as a flavoring.
Step 5.

Add the desired amount of invert sugar to the puree, stir and place the container on a low heat. Bring its contents, stirring constantly, until it begins to boil (appearance of small bubbles on the edges of the container). Then take the pot off the heat, reduce the mashed potatoes to about 60-70°C, stirring occasionally with a spoon.
Step 6.
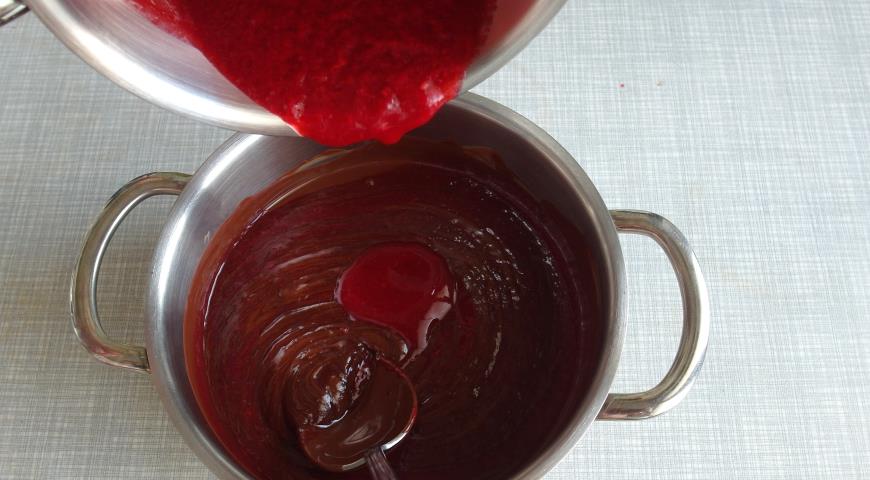
Pour the mashed potatoes into the melted chocolate and mix until smooth with a spoon. Leave the chocolate-berry mixture to "mature" at room temperature, uncovered, for about 1 hour. Every now and then, while the mixture is "maturing", stir it vigorously in a circle in the same direction with a spoon: you will see that the mixture gets thicker and thicker every time you use it. Cover the pan with clingfilm and leave it in the refrigerator at 5-6°C for about 3 hours.
Step 7

When the candy mass has cooled sufficiently, prepare a large aluminium tray (21×32 cm, 5 cm high, or any other similar area you have available), lining it with non-stick parchment. Take the mass of chocolate and berries out of the fridge, cut it into 20g pieces with a spoon (you'd better do it with a scale), roll them into balls (you can do it with your bare hands or with disposable vinyl confectioners' gloves, so that the mass melts less and stains your hands less). As you cook, place the truffle balls on the baking tray, and when you're done, close the tray tightly with plastic wrap and put it in the fridge at 0-6 °C for 8-12 hours to allow the truffles to cool well.
Step 8
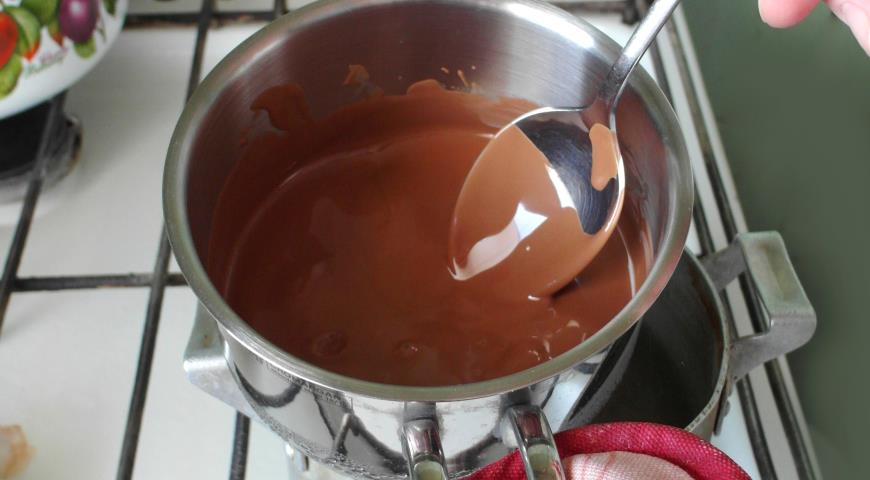
After the truffles have cooled down, they can be covered with milk chocolate, for which you need to take it out of the fridge in advance (2-3 hours before use), if you store it there, and then melt it in a water bath (as described in step 3). It is better to use a narrow metal saucepan with a thick bottom, about 700 ml and 12 cm in diameter (because you won't have much chocolate, and in a bigger dish it will spread all over the bottom, and it will be difficult to put the whole candy in it).
Step 9

Then remove the chocolate from the water bath and cool until barely warm, and in the meantime grind the freeze-dried raspberries into powder in a coffee grinder. Prepare a fine strainer to sprinkle the candy with this powder and an "appliance" (a fork or, like mine, a tea strainer) on which you will dip the candy into the chocolate.
Step 10.

When the melted chocolate has cooled to the right temperature, remove the tray with the truffles from the fridge and immediately begin glazing them. To do this, one by one dip each one completely into the chocolate, placing the piece on a fork or a handle of a tea strainer (like mine - see photo), and then immediately return them back to the tray. If you like, you can make extra chocolate "curl" patterns on the frosting surface afterwards. If after the procedure you still have "unused" chocolate in the saucepan for frosting, you won't need it in the recipe anymore, and you can eat it pure or add to it for flavor, for example, finely chopped walnuts, preheated slightly in the oven.
Step 11

When all the candies are glazed, immediately sprinkle them with crushed freeze-dried raspberries, sifting it through a fine sieve, again close the tray with them tightly covered with plastic wrap and put in the refrigerator for a couple of hours or until serving. Before serving, you can remove the drips of chocolate from the bottom of the candies, if you want, by cutting them with a sharp knife (which each time should be briefly heated in hot water and then wiped dry, so that the cut was even), but after such a procedure then hold the candies in the fridge for another 30 minutes. To make the serving of candies even more spectacular, just before it, you can put them in special paper molds (capsules) of appropriate diameter. Bon appetit!
Step 12
This kind of candy does not last long at room temperature: the milk chocolate begins to melt, so the rest can only be stored in the refrigerator at 0-6 ° C - up to 4-5 days. If you don't really care about their appearance, you can put them in a clean plastic bag after cooling (see step 11).

You must be logged in to post a comment.