

You'll need to purchase a domain, sign up for hosting, and install WordPress in order to sell your products using WordPress. This article will walk you through each step of that process and more!
It's not surprising that you desire to create an ecommerce website with WordPress because it's a well-liked, strong, and scalable platform. But in addition to solid web hosting and dependable plugins, you also need WordPress to build a successful online store.
If you're connecting your online store with a WordPress website, we highly recommend Bluehost and WooCommerce.
The nine steps to starting your WordPress e-commerce website are as follows:
1 Score the perfect domain name
Essentially, your domain name serves as the address for your website. It's the text in your URL that comes after the www. For instance, ours is "websitebuilderexpert.com".
A domain name can be purchased from websites like NameCheap. If you're lucky, you'll discover that the one you desire is available for free or for a reasonable price ($10–$20/year). If you're less fortunate, it's possible that your ideal domain name is already taken or that it can be purchased through resale for a considerably higher price, sometimes in the several hundred or even thousands of dollars range. However, after the first year, even the most expensive domain names will renew at the regular fee ($10 to $20/year).
In general, it's a good idea to keep your domain name as short and memorable as you can, and as similar to your brand name as you can.
It's good to know that the most well-known and powerful domain extension is ".com" (ending). It's a wise decision for internet retailers since it allows for global sales. If you choose a country-specific extension, like.us, you run the risk of reducing your future growth opportunities.
Verify the following before going on to the next step:
- Have you considered a catchy and pertinent domain name for your e-commerce website?
- made sure it was available
- purchased it and set a yearly renewal reminder!
2 Sign up to a hosting provider
Now that you've secured your domain name, it's time to locate a web hosting company.
All websites require hosting. It's like renting a piece of internet real estate; just be sure to choose a patch with lots of opportunity for expansion!
You must consider the type of store you're constructing while deciding on the best hosting provider and the kind of hosting you truly require.
We will advise you to avoid shared hosting, nevertheless. If one of the websites on the server you share gets hacked, your website becomes susceptible as well. This simply isn't worth the risk when you're dealing with people's credit card information.
In our investigation into hosting for WordPress, Bluehost came out on top. WordPress can be more difficult to manage and keep up with than ecommerce builders and platforms; you first need to install the software before keeping up with upgrades and security. We give Bluehost a high rating because it automates a lot of this for you and provides reliable hosting in and of itself at a reasonable cost. WordPress is a provider that benefits both parties.
We advise starting with one of Bluehost's WooCommerce hosting plans whether you're just getting started with a few products or you anticipate your business expanding soon. Bluehost's WooCommerce plans aren't simply powerful e-commerce platforms; they're also designed to simplify your life. They have one-click payment processing instals and an automatically installed shop theme, and their monthly prices start at $12.95. You'll be able to sell an endless number of goods.
Verify the following before moving on to the next step:
- Have you considered the type of web hosting you should choose?
- Check out our article on the top WordPress web hosts.
- enrolled in a hosting package
3 Install WordPress
WordPress can be installed in two different ways:
- One-click installation from your hosting control panel
- WordPress must be manually downloaded, then uploaded to your hosting account.
One-click installation of WordPress
The first choice, as you could anticipate, is unquestionably the simplest and is the one we advise. Check out the companies on our list of the top WordPress hosts to get a selection of the best. When choosing a hosting service, seek for those offering the benefit of "one click" instals.
After signing up with a hosting company that offers this installation, all you need to do is go to your hosting dashboard and click the "Install WordPress" option. This is our tutorial on installing WordPress with Bluehost, however the procedure is generally the same with most hosting companies.
Top advice! Have you read our review of the top e-commerce website builders? We've explored the ideal platform for your needs, whether you're a side hustler or aiming for worldwide dominance. What's best? There is no need to bother about setting up hosting or downloading any software because everything is included in a single low monthly charge.
WordPress installation by hand
It is necessary to download WordPress to your computer before uploading it to your hosting dashboard if your hosting company does not offer one-click WordPress installation. It's not as simple, but it's still simple enough. Check check this WordPress installation tutorial if you want to do it yourself.
Verify the following before moving on to the next step:
- WordPress was set up either manually or by your hosting company.
4 Install and configure WooCommerce
The most popular WordPress plugin for e-commerce capabilities is WooCommerce. More than 3,000 users have given it a 4.6/5 rating, and there are more than 4 million active installations. It's fair to say that it's quite well-liked, and it's understandable why.
To begin with, it's free. WooCommerce is an open-source platform created by a community, much like WordPress itself. While some "extensions" (like the ability for users to book appointments) may need a fee, you can transform your website into an online store without investing a dime. That contains:
- Product pages
- Cart and checkout
- Secure payments
- Shipping options and label printing
- Automated tax calculations
- Integration with Google Analytics, Facebook, MailChimp etc.
Top tip: Bluehost makes WooCommerce installation really simple. Getting everything ready to go live might be one of the biggest difficulties with an ecommerce shop, but that's not the case with Bluehost's WooCommerce plans. They offer one-click installations for payment processing and come pre-configured with a theme for an online store website.
As you can see, we like WooCommerce a lot. However, if for whatever reason you don't like WooCommerce, check out our list of the best WooCommerce alternatives.
We'll proceed with the installation and configuration process as if that's what you'll be using for the time being and make the following assumptions:
1.Installing and turning on WooCommerce
Log into your WordPress dashboard and select "Plugin" from the left-hand menu to access the plugin directory:
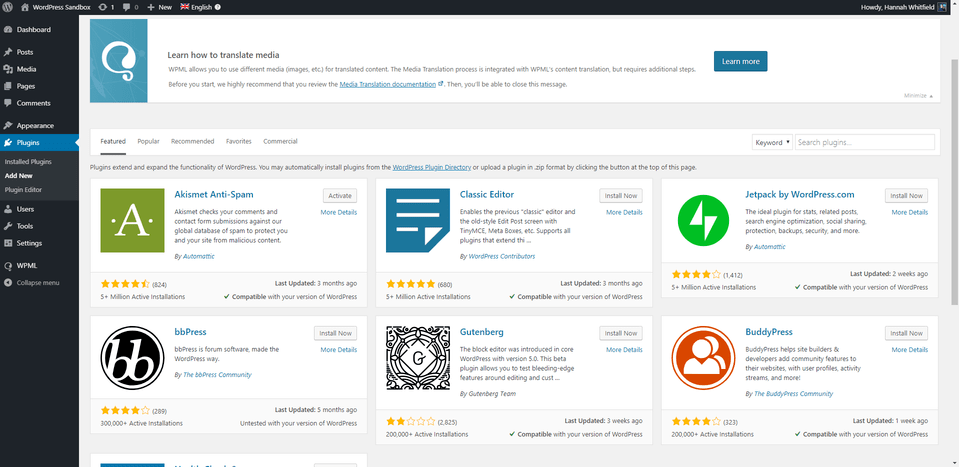
Use the search field to look up "WooCommerce" and then click the grey "Install Now" button.

This button will change to a blue one that says "Activate" after a short while. Click here.
The helpful WooCommerce setup wizard will then launch and guide you through the remaining steps of setup.
2. Add company information
You must first complete your business's information, which is rather self-explanatory:
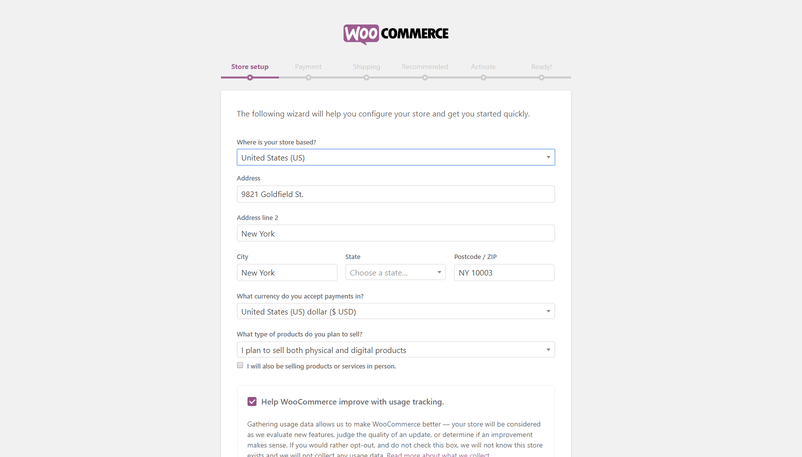
Make sure the answer to "I plan to sell both physical and digital products" is the correct one.
3. Choose your payment methods.
The next step is to decide which payment options your store will take.
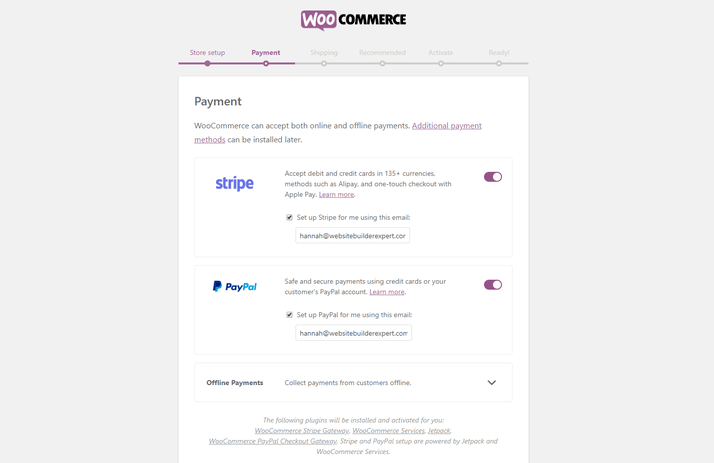
We advise you to enable both Stripe and PayPal because they are both well-liked options. If you haven't yet set up your accounts, you can add them later.
4. Verify shipping choices
You will then be prompted to select your shipping costs. Your present location will be identified by WooCommerce as your primary "shipping zone," with "the rest" serving as the alternative option:
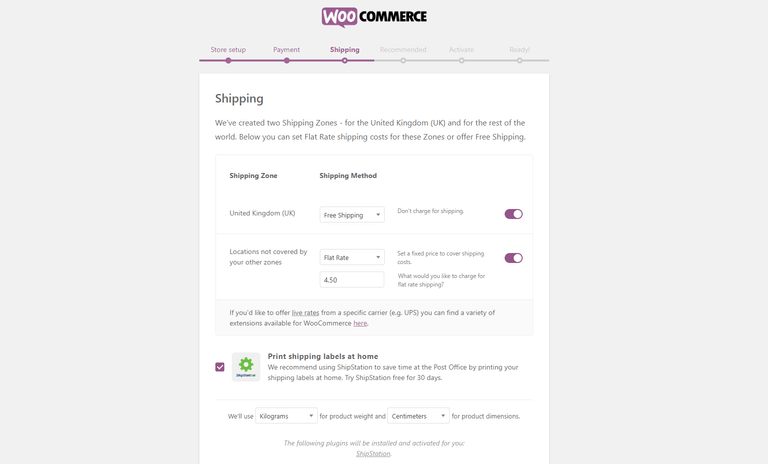
To get "real" shipping rates, you can either connect with particular carriers (like UPS) or set shipping to be free for each zone.
5. Pick an additional plugin or theme.
Making decisions about which "recommended" plugins to add to your store and whether to use WooCommerce's own theme come next.
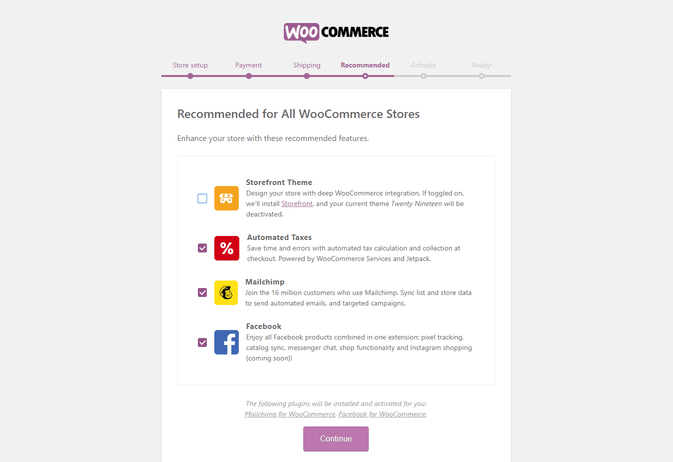
Don't feel like you have to make a decision right away; these are quite simple to add later. Feel free to "unselect" these for the time being, unless you're absolutely certain you need them. We'll cover suggested plugins and themes a bit later on in the post.
6. Turn on the jetpack
You'll be prompted to turn on Jetpack during the last setting stage.
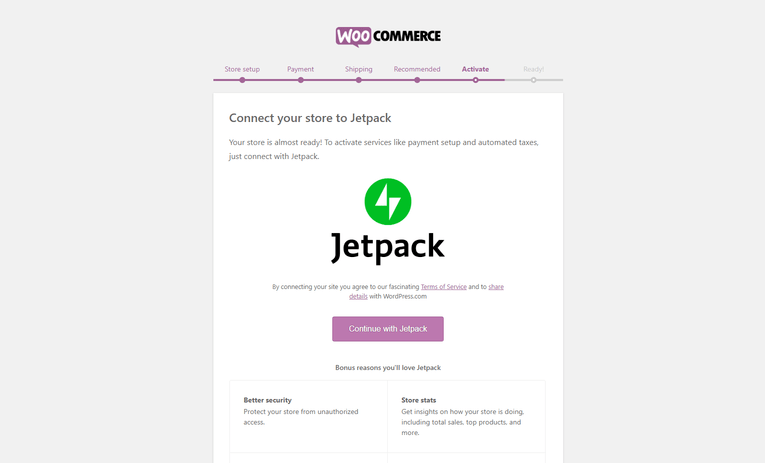
Later on, this will make it possible for you to automate taxes and set up payments. Select "Continue with Jetpack"...
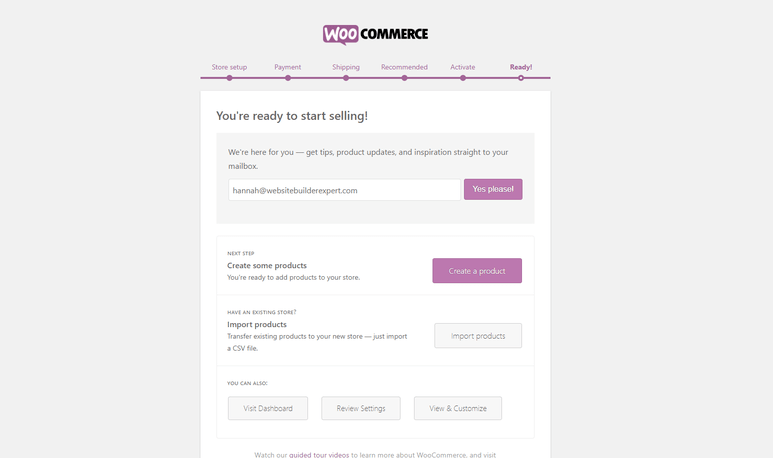
And that completes your basic setting! It's now time to include your products.
Verify the following before moving on to the next step:
- Found WooCommerce in the list of WordPress plugins, activated it, and installed it.
- Added your primary contact information
- selected delivery and payment methods—keep in mind, you can alter them at a later time!
5 Choose a theme
Your "theme" will serve as the fundamental layout of all of your web content. With WordPress, you may completely customise your website; by changing or adding to the HTML code, you could easily wind up with something that doesn't resemble the initial design.
However, unless you're an expert coder who would love the chance for total modification, it makes sense to pick a theme that resembles your desired finished product as closely as you can.
In other words, choose a theme that you enjoy and will be useful for your e-commerce website, even if that means spending money on a high-end template from a third-party website. In the long run, it will save you trouble!
There are many wonderful third party sites out there, but two of the most well-known for selling themes are ThemeForest (large range) and Elegant Themes (limited, curated selection).
Once you have a sizable selection of products prepared, it's time to move on to the more enjoyable tasks, like picking a theme!
You may access the theme directory from your dashboard, where you can find a variety of free WordPress themes:
- Open your WordPress dashboard and log in.
- Select "Appearance" and then "Themes." You'll then be directed to the theme dashboard by doing this.
- Then, explore themes under "Featured," "Popular," etc., or use the search field to look for particular industries. Click the "Add New" button above the themes.
- Try out a few themes until you find one you like, then click "Install" to download it.
- A button labelled "Activate" will eventually appear under the theme after a little while. When you click this, the theme is yours to keep.
How to add a premium theme to your website:
- Download your new theme's.zip file.
- Open your WordPress Dashboard and log in.
- Select "Appearance" and then "Themes." You'll then be directed to the theme dashboard by doing this.
- Select "Add New" from the menu that appears above the themes. The WordPress theme dashboard will then be displayed.
- To upload a theme, select the blue "Upload Theme" button at the top.
- The next step will ask you to select a.zip file from your PC. Select a new theme file.
- A success message with a link to activate your theme will then appear. You are now prepared to leave.
Top tip: WooCommerce also has its own theme, called Storefront, which, as you might guess, integrates well with WooCommerce and has a modern design.
However, since anyone might conceivably create a template and post it online, it's critical to evaluate how reliable one is before you proceed. If you pick a shoddy theme, you run the risk of opening yourself up to hackers. And don't forget to "demo" each one so you can see how your actual site might appear.
6 Add products
The final step in setting up your initial WooCommerce configuration, installing Jetpack, will prompt you to add your first product.
It's okay if you're not yet prepared to upload. When you get back to your dashboard, simply click "Add New" under "Products" on the left-hand side:
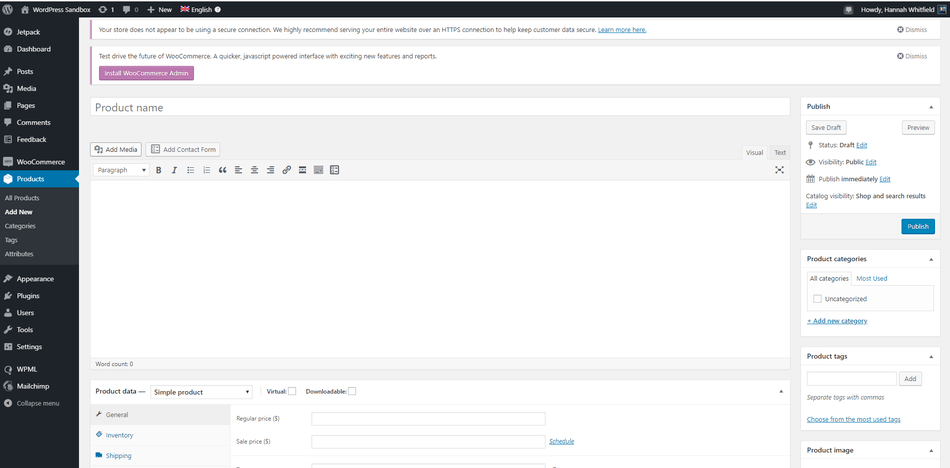
You'll need the following items for each product you upload:
- Name of the product, such as Cute Pale Grey Cement Plant Pot
- Price, say $12.95.
- The primary product image should show the entire item from the front.
- Additional product shots are optional but advised; use as many different perspectives and closeups to show the item's finer characteristics.
- Long product description, such as With this straightforward cement planter, you can add a touch of Scandinavian charm to your house. Contains a drainage hole and a little matching dish to prevent over-watering of your plant. Size: 15 cm. Dimensions: 8 cm.
- A succinct description of the product, such as "Simple cement planter with drainage hole and matching tray."
- Product category, if you have any, such as "Plant Pots"
Product addition using WooCommerce
The sort of product you're adding will determine how you add it to your website. There are six primary categories:
- Simple
- Grouped
- External/Affiliate
- Variable
- Downloadable
- Virtual
The great, comprehensive documentation provided by WooCommerce explains each product type's definition and provides instructions on how to upload each type.
We'll stick with our plant container example for the time being. This is a straightforward product (if the pot in question had additional sizes or colours, it would be a variable product).
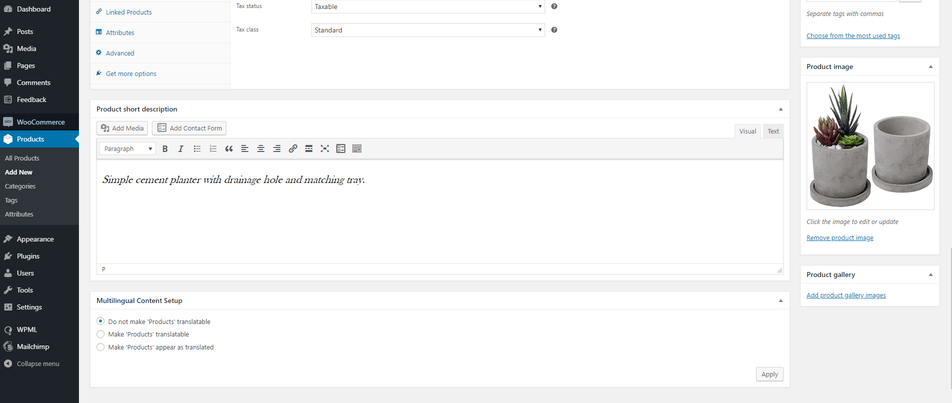
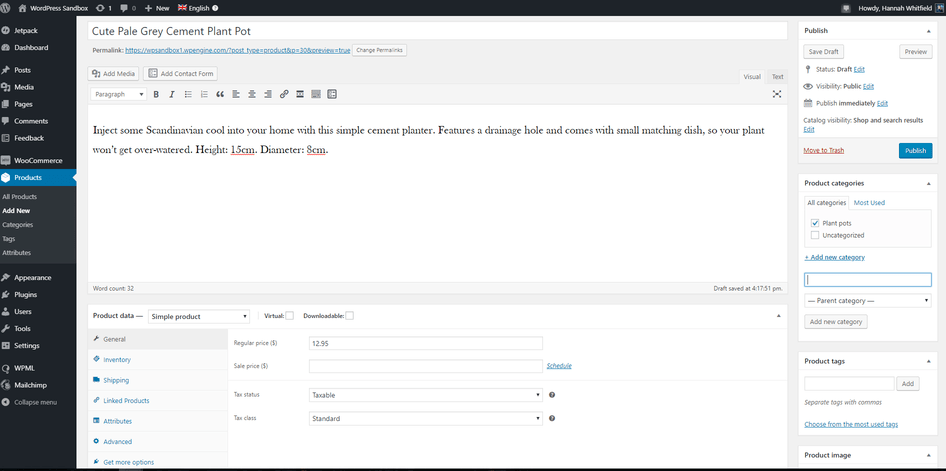
You can see how we filled this screen with all the data we mentioned previously here. On the right, you'll see that we've put this item to the "Plant pots" category. We simply chose the underlined "+Add new category" button on the right, gave our new category a name, and checked the box before deselecting "Uncategorized." More images of our gorgeous plant pot would appear in the "Product gallery" area below the main image if we had any.
You'll need to click through each tab in the middle once you've supplied this essential information to add all the detailed information about your product. Here is a brief summary of the information provided in each tab of the product data section:
- Our current tab, General, is the one that deals with price and tax.
- If you wish to be able to track your inventory, add SKUs and other information to inventory.
- Dimensions of the product and the cost of shipping
- Updated later with related products to increase upselling
- If you have a variable product (one with various sizes or colour options, for instance), this is where you should put the various variations.
When you are satisfied with your finished product, click the blue "Publish" button located towards the top, on the right side.
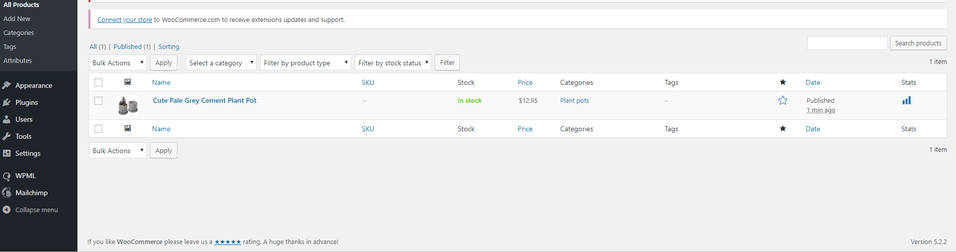
Go to "All products" in the menu on the right to see any products you publish; they will show up like this:
Verify the following before moving on to the next step:
- You should have created titles, lengthy descriptions, and concise summaries for each product you intend to upload.
- taken photos of the goods
- goods were added to your WordPress dashboard.
- items categorised by category
7 Install additional plugins
Here are three plugins for online stores that we particularly recommend in addition to WooCommerce:
1.Yoast for SEO advice, to start
If no one can find it, having the best online store in the world won't mean a thing! Enter Yoast SEO, a helpful plugin that will aid in your ascent through search engine results, giving you the best opportunity to land on page one. Search engine optimization, or SEO, is the process of making minor modifications to your website that will enable search engines to better "read" and "understand" your material and, as a result, "prioritise" it.
2.Securi for security, second
The risks to your site's security increase when you accept credit cards. Even though there are free security plugins available (like Wordfence), we believe this is an area where a little additional money should be spent. The free plugin from the WordPress plugin directory must be installed in order to use the Securi plans, which start at $199 per year.
P.S. - We probably don't need to stress how important it is to secure your website. So don't put it on the "too hard" list; instead, use this guide to learn how to secure your WordPress website.
3. Reviews on the website
Social proof has repeatedly been shown to be one of the most crucial elements in persuading consumers to perform the desired action, which in this case is to purchase your products. Customers will be able to post reviews on your website once Site Reviews is installed.
It's incredibly easy to add plugins to your website:
- Open your WordPress dashboard and log in.
- Go to "Plugins" and then "Add New."
- To find individual plugins or a general functionality, use the search field in the top right corner of the page.
- Once you've chosen one that appeals to you, check out reviews and ratings to make sure it seems reliable.
- Once you're satisfied with your decision, click "Install Now."
- You'll see a popup indicating that WordPress has completed downloading the plugin, at which point you'll be asked to click "Activate Plugin."
- After that, go to settings to configure your plugin. Each one has a different procedure for doing so, but the plugin description should include instructions.
Verify the following before moving on to the next step:
- Considering any additional requirements for your website
- the ideal plugins to implement this functionality have been located
- before installation, I made sure the reviews were reliable by checking them.
8 Add content that converts
It's now time to edit the copy on your important pages. Go to "Pages" and then "All Pages" to find these important pages.
Make sure to read our comprehensive guide on writing for the web, which is filled with tips from copywriting professionals.
But for the time being, we'll concentrate on a few distinct kinds of material. If you master all of the things listed below, you'll be well on your way to building a profitable online store:
1. Microcopy
Microcopy, also known as "UX copy," refers to the brief passages of navigational copy, error notices, and "calls to action" on your website (CTAs).
This is the most crucial material on your website, word by word. It leads visitors through your website and reassures or persuades them at crucial moments (like just before they give you money, for example).
Take your time and carefully craft this. Consider the thinking of your users at each step of their website navigation. A button saying "Find out more information" or "Have a browse" next to your product on the homepage, for instance, could be more relevant. Since your customer is still likely not ready to make a purchase at this point, a more forceful message like "Buy now" can be quite off-putting.
2. Product discriptions
These ought to be succinct but informative—and as the name would suggest, descriptive. When purchasing that item for yourself, consider all the details you would need to know, especially those that aren't obvious from the product pictures.Maintain consistency in the formatting and material across all items by using bullet points to split out the information.
3. Images of products
Your website could succeed or fail based on the quality of your product photographs. For optimal results, use a high-quality camera and a plain background. The more product photographs, the better, is a general maxim. For a clean-looking website, keep your product photos constant, just like you would with the descriptions.
Top advice: Make sure you use a tool like TinyPNG or Kraken to compress your images. This will assist maintain your site as quick as possible by reducing the file size without sacrificing image quality.
4. Privacy Policies
WordPress will actually require you to choose a privacy policy page before making your site public, making it a crucial part of any website. Fortunately, you can use a helpful template that is readily available.
Just go to "Settings," select "Privacy," and then click "Check out our instructions." Simply choose the appropriate page from the dropdown menu below once that has been written up.
Verify the following before moving on to the next step:
- Personalize your website's content, including the homepage cart and shop pages.
- compelling CTAs that are carefully developed and clear navigational content
- written and posted a privacy statement
9 Make your site public
It's time to launch your site once you're essentially satisfied with how it functions (remember, you can always "Preview" pages to see how they'd look live).
The simple part is now!
Select "Settings," then "Privacy." Once your privacy statement has been posted, you should be able to make your site "Public."

You must be logged in to post a comment.